Learn Video Editing from Scratch: A Beginner’s Guide
Learn video editing from scratch: the best free software, the six stages of every edit, shortcuts, types of cuts, export settings and a simple 30-day plan.

Behind every video that keeps you watching to the last second, on YouTube, TikTok or Instagram, there is good editing: a cut at the right moment, clear sound and a pace that leaves no room for boredom. The good news is that to learn video editing from scratch you no longer need an expensive computer or paid software. In this guide you will discover the best free programs, learn the six stages of any professional edit and the right export settings, with a free printable PDF guide to practise with.
What is video editing?
Video editing is the art of assembling, ordering and trimming footage, then adding sound, music, text, effects and colour correction so that raw clips become a coherent story that holds the viewer. A good editor does not just remove mistakes: they control the pace and the moment each piece of information lands.
The best video editing software for beginners
Do not waste weeks comparing programs: the core skills are the same in all of them, and what you learn in one carries over to the others. Choose according to your device and the kind of video you want to make:
Software | Price | Devices | Best for |
|---|---|---|---|
CapCut | Free, with an optional Pro subscription | Phone and computer | Short videos and social media content |
DaVinci Resolve | Full free version with no watermark; paid Studio version | Windows / Mac / Linux | Anyone who wants a professional path without paying |
Premiere Pro | Monthly Adobe subscription | Windows / Mac | Professional work with companies and teams |
iMovie | Free | Apple devices | Very simple first steps |
Our advice: start with CapCut if your goal is Reels and TikTok, or with DaVinci Resolve if you want editing as a career; its free version exports up to 4K and can be downloaded from the official DaVinci Resolve page.
How do you learn video editing from scratch?
Every edit, from a 30-second clip to a documentary, goes through the same six stages. Learn them in this order and apply each one to a real video you shot on your phone:
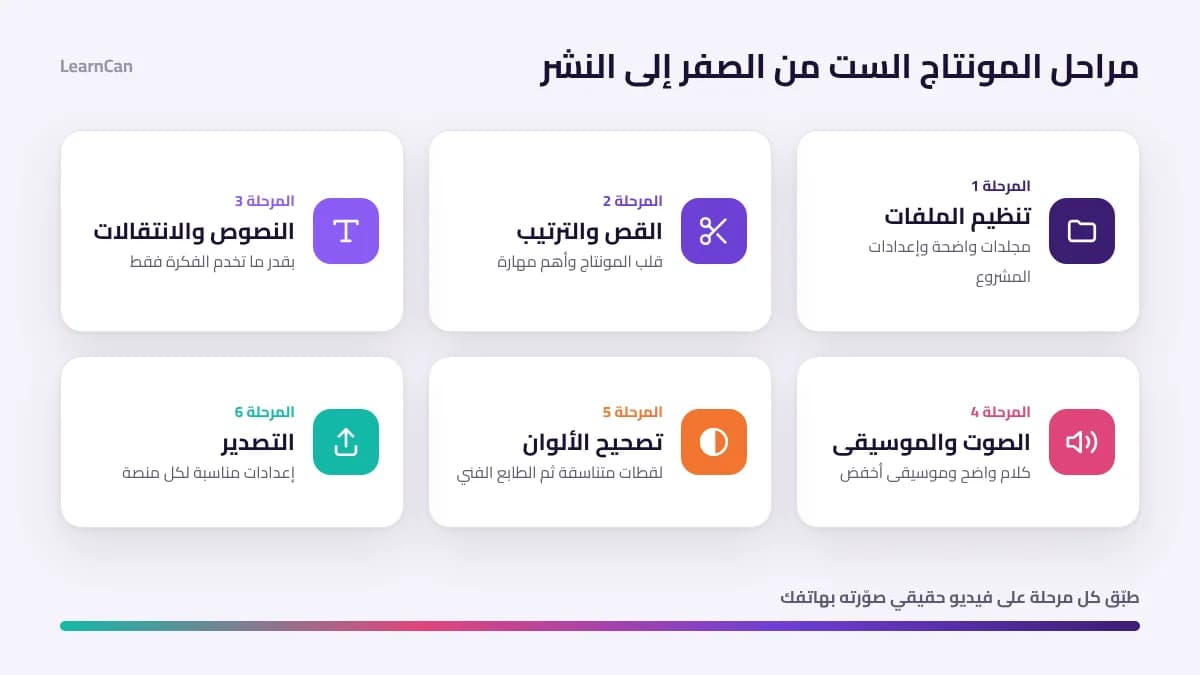
- Organise files and set up the project: before you touch a single clip.
- Cut and arrange: the heart of editing and the most important skill of all.
- Text and transitions: only when they serve the idea.
- Sound and music: half of a video’s quality is heard rather than seen.
- Colour correction: a consistent image from the first shot to the last.
- Export: the right settings for each platform.
Step 1: organise your files and set up the project
Create a folder for each project with subfolders: footage, audio, music, images and exports. It sounds tedious, but it saves you from missing files as the project grows. Then set up the project: 1920x1080 for horizontal video or 1080x1920 for vertical video, with a frame rate matching what you shot, as YouTube itself recommends.
Step 2: cut and arrange on the timeline
The timeline is your workspace: clips go on the video tracks, sound on the audio tracks, and the playhead shows the current frame. Start by arranging the clips in story order, then delete everything that adds nothing: hesitations, long silences and repetition.
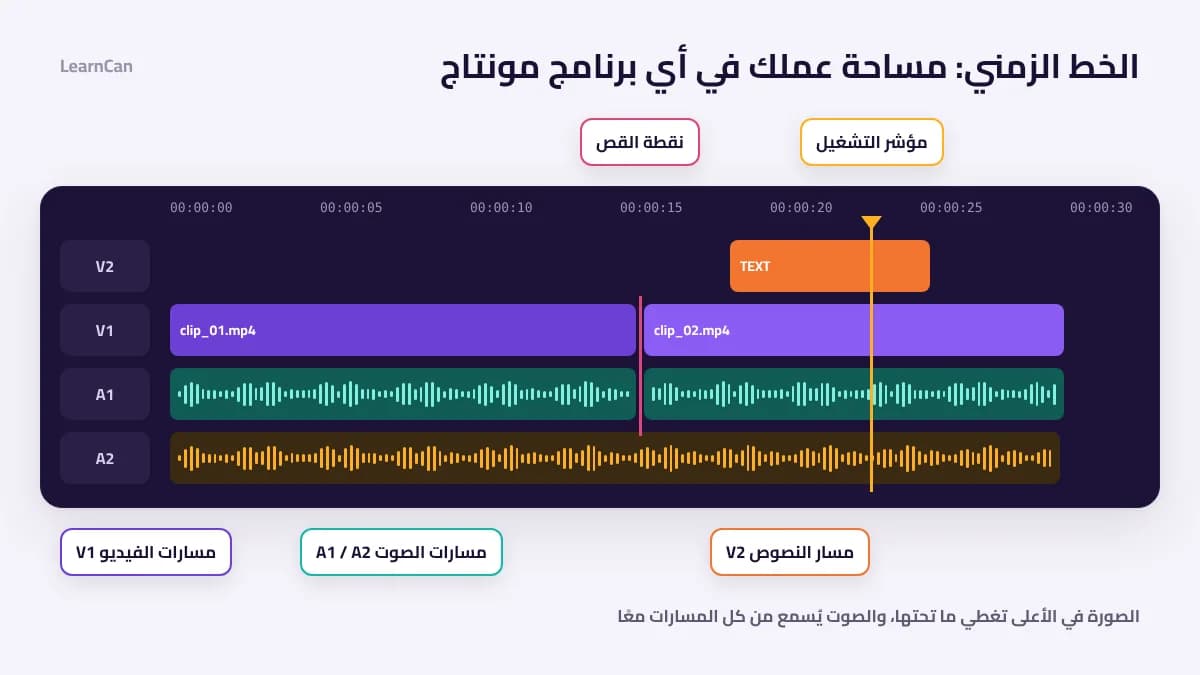
The golden rule: if you hesitate about cutting a shot, cut it. Viewers do not know what you removed, but they feel every extra second. Learn the cutting shortcuts from day one; they will save you hours:
Action | CapCut | DaVinci Resolve | Premiere Pro |
|---|---|---|---|
Split the clip at the playhead | Ctrl+B | Ctrl+B | Ctrl+K |
Play / pause | Space | Space | Space |
Play backwards or forwards | — | J / L | J / L |
Stop on the current frame | — | K | K |
Undo the last action | Ctrl+Z | Ctrl+Z | Ctrl+Z |
On a Mac, replace Ctrl with Cmd. In DaVinci Resolve and Premiere Pro you can press J or L several times to double the playback speed and reach the cut point quickly.
Step 3: text and transitions
The mistake that gives a beginner away most is flashy transitions between every two shots. A straight cut is what professionals use most of the time, and a gentle fade is enough to show time passing or the end of an idea. Keep text short and clear, in a font that is easy to read on a phone, away from the screen edges so platform buttons do not cover it. And add captions, because many viewers watch without sound.
Step 4: sound and music
Viewers forgive an average picture, but they leave at once if the sound is bad. Clean the voice with the program’s noise reduction tool and keep its level steady from start to finish. The usual range for speech is between −12 and −6 dB on the program’s meter, with music clearly lower. Use licensed music or tracks from free libraries so your video is not taken down for copyright.
Step 5: colour correction
Tell two stages apart: colour correction fixes exposure and white balance so shots look natural and consistent, while colour grading gives the whole video an artistic look. Always start with correction, and do not reach for ready-made filters until your shots match in light and colour.
Step 6: export your video with the right settings
Wrong export settings can ruin hours of work. These are the right settings for a beginner, by platform:
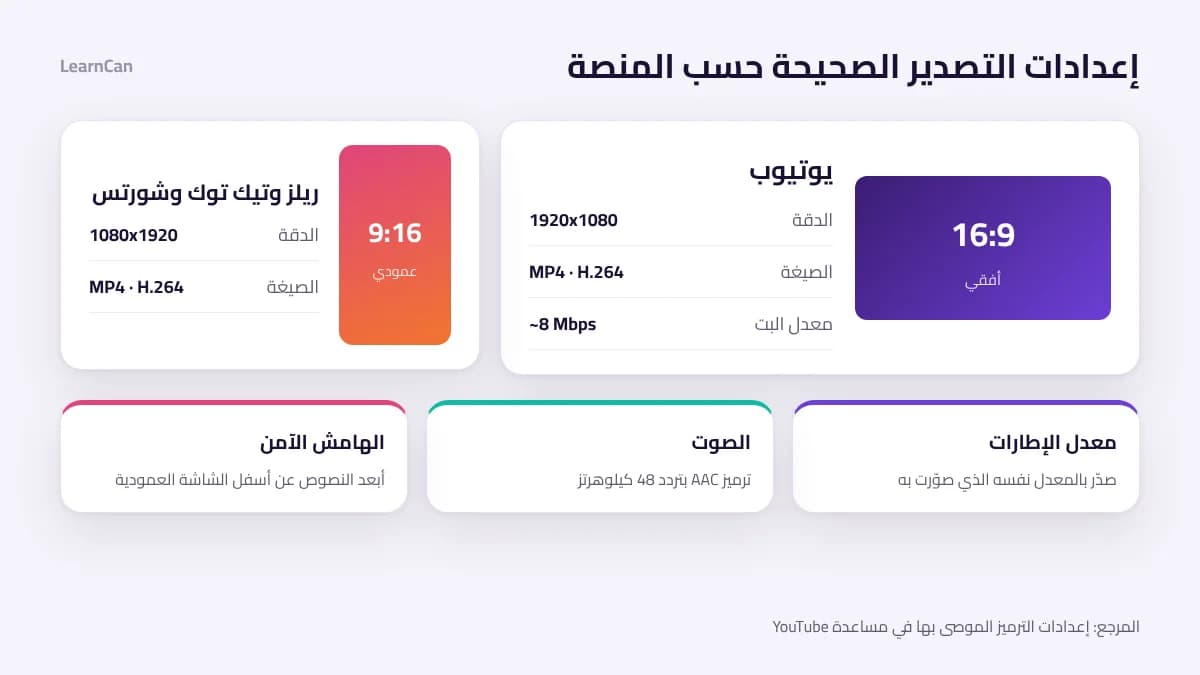
Platform | Resolution and ratio | Format | Note |
|---|---|---|---|
YouTube | 1920x1080 at 16:9 | MP4 with H.264 | Bitrate of about 8 Mbps for 1080p |
Reels, TikTok and Shorts | 1080x1920 at 9:16 | MP4 with H.264 | Leave a safe margin for text at the bottom of the screen |
All platforms | The same frame rate | AAC audio | Export at the frame rate you shot |
The YouTube figures come from the recommended upload encoding settings in YouTube Help, an official reference worth keeping at hand.
The types of cuts professionals use
Once you master the simple cut, learn these five types; they are what give a video a professional rhythm:
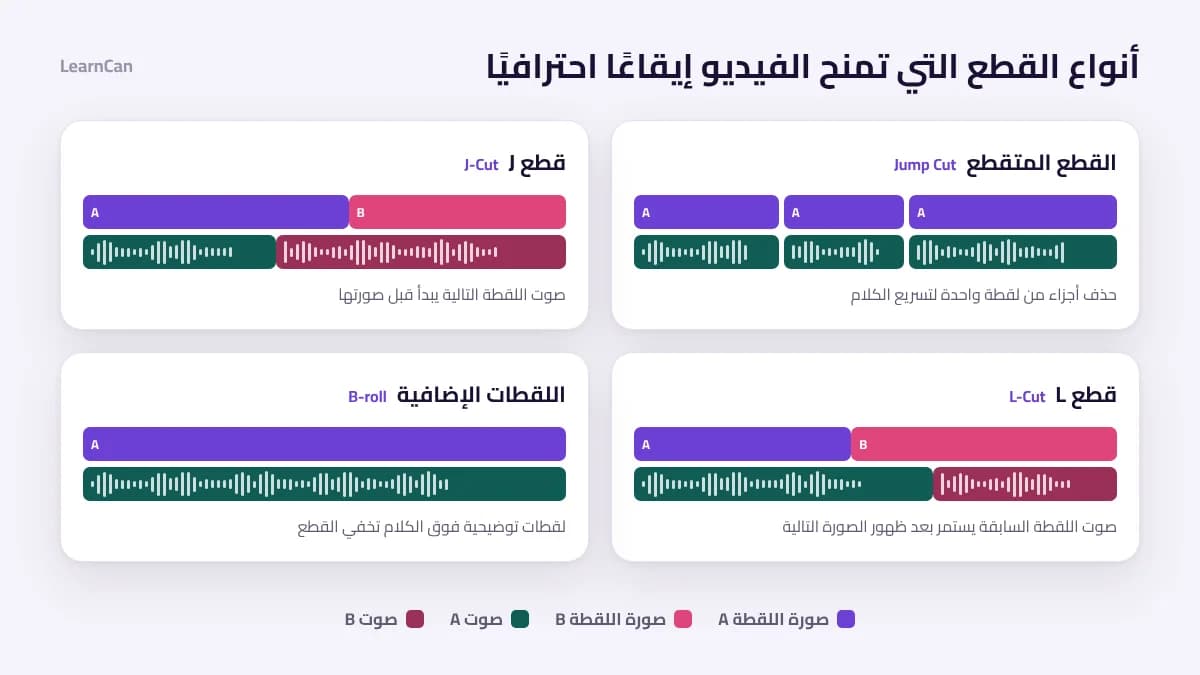
- Jump cut: removing parts of a single shot to speed up speech, very common in YouTube videos.
- J-cut: the sound of the next shot starts before its picture, easing the transition.
- L-cut: the sound of the previous shot continues after the next picture appears, as in dialogue.
- B-roll: illustrative footage that covers the voice and hides the cuts.
- Match cut: moving between two shots that share a similar shape or movement.
A 30-day plan to learn video editing
Real learning comes from projects, not from watching tutorials. Complete one small, full project every week:
Period | What you learn | Project of the week |
|---|---|---|
Week 1 | The interface, cutting and arranging | A 60-second video about your day |
Week 2 | Text, captions and transitions | A short captioned tutorial |
Week 3 | Sound and music | A talking-head video with background music |
Week 4 | Colour and export | A vertical Reel ready to post |
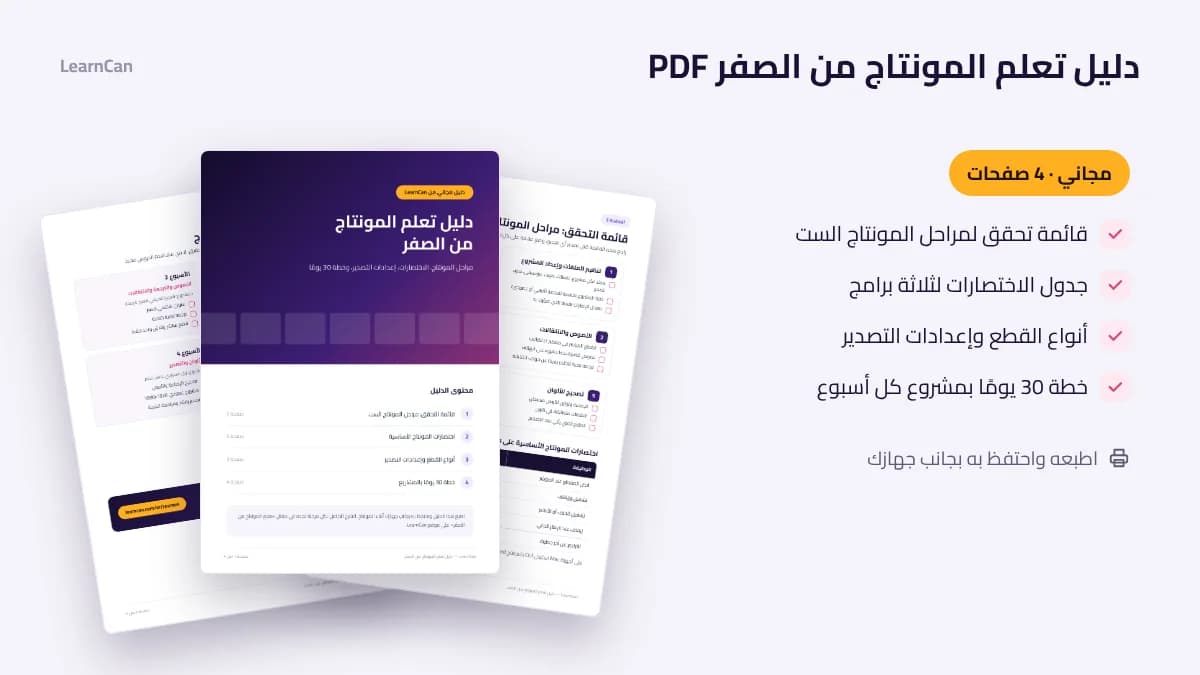
Download the free video editing guide (PDF)
We have gathered the essentials of this article in a four-page PDF (in Arabic): a checklist of the six editing stages, the shortcuts table, the types of cuts, export settings for each platform and the 30-day plan with its projects. Download the free PDF guide here.
Common beginner mistakes
- A slow start: the first seconds decide whether viewers stay, so get straight to the point.
- Neglecting sound: a cheap microphone near the mouth beats the most expensive camera with bad sound.
- Overusing effects: every effect must serve the idea, not show off the software.
- Working without backups: turn on autosave and keep a copy of the project.
- Switching software every week: mastery comes from going deep into one tool.
Frequently asked questions about video editing
Can I learn video editing on my phone only?
Yes, to begin with, especially for short videos: the CapCut app on a phone is enough to learn cutting, text and sound. But long projects and colour correction are much easier on a computer.
Do I need a powerful computer?
Not at first. Any recent device with 8 GB of memory is enough for simple 1080p projects. Over time you will need more memory and a better graphics card to work in 4K with heavy effects.
How long does it take to master video editing?
Within a month of daily practice you can produce clean, decent videos. Professional pacing and an artistic eye grow with every project, so set yourself a new project every week.
Summary
To learn video editing from scratch, start with one short video: organise your files, cut boldly, take care of sound before effects, then export with the right settings. Download the free guide and start the first week’s project today. To keep building your skills, explore LearnCan courses and the latest articles on LearnCan.